If you are completely new to Grand Theft Auto 5 Modding and don’t know how to install GTA 5 mods, this tutorial can help you. Providing prerequisites might take time for the first time, but don’t worry, once you go through them you don’t have to repeat the process every time and you can enjoy the game.
Important Note * do not play GTA Online with a modded version. It can get you banned.
What is Modding
Modding in video games is an act when you change or alter something in-game files which result in unusual things happening in your game. For example, in GTA you can change your character completely, or add scripts to the game so you can open Interiors, so all buildings would be accessible. In this tutorial, we are going to discuss the basics of modding and teach you how to start and add your first mod in GTA 5. Since our website’s subject is around cars we will specifically discuss adding cars to your game.
How to install GTA 5 Mods
Providing prerequisites
These are the requirements that you need in order to make your game suitable for installing mods. you don’t need to install them every time. once you get these installed you only may need to update them from time to time.
1.OpenIV
This software is necessary to edit GTA 5 files. You can download it from here : OpenIV
Once you install this software and run it, You’ll encounter this windows :
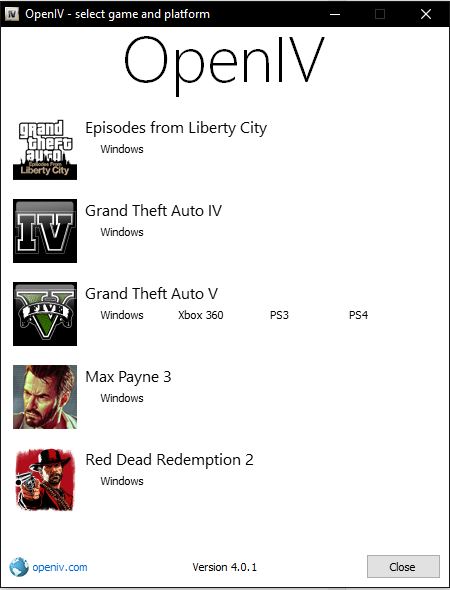
You have to choose the “Windows” section of Grand Theft Auto V. Then you’ll need to locate you GTA 5 folder. If you have a steam version you can locate your game by following this steps:
- Go to your steam library.
- Locate Grand theft Auto V, right-click on it, and choose properties.
- Choose ” Local Files ” from the left side menu.
- On the Local files tab, click on Browse to find your game in file explorer. copy the address and use it in OpenIV
If you get a green Success message from OpenIV, it means that you have located your game correctly and you should be able to view GTAV game files in your OpenIV window:
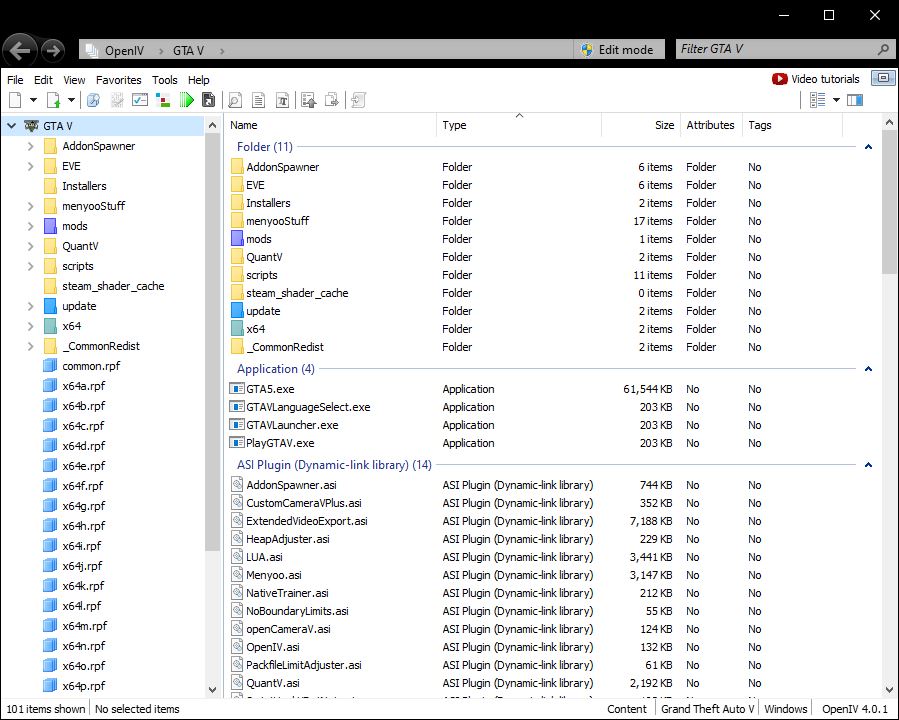
Of course your files are different from what is shown here, because this GTAV is already modded.
You have to enable “Edit mode” in order to edit game files with OpenIV.
2. Mods and Scripts folder
In order to install GTA 5 mods, you need to have a mods folder in your GTA 5 directory. you can install GTA 5 mods in the game folder too, but it’s not recommended at all since some mods can crash your game, and then you have to reinstall everything from beginning our restore your backup. But with the “mods” folder you only need to restore a portion of GTA 5. When you set up openIV it will likely ask you to create a ” mods ” folder in your game directory, But if it didn’t, just create it manually and It’ folder will automatically get a purple color.
You can add the Scripts folder in the same directory as the mods ( Main GTA 5 folder ). Right now it’s not necessary since we are planning to add scripts in this tutorial.
3. ASI Loader and OpenIV .ASI
While in OpenIV, click on Tools and choose ASI Manager. from that window you can install ASI Loader and OpenIV .ASI easily by clicking install. OpenIV will install them for you.
4.Install Script Hook V and Community Script Hook V .NET
You can download them from these links:
After you’ve downloaded them unzip them, and copy / paste their files in your MAIN GTA 5 folder so have something like this in your folder :

Pay attention to the requirements of Community Script Hook V that has been written in it’s page. You should download and install those as well.
5. Add Trainers
Now your game is ready to install mods. In order to take advantage of this feature, you need trainers. They will let you do everything you want. For example enabling the god mod, making your wanted level disappear, changing the time and weather, and a lot of other exciting stuff. one of the Best trainers for GTA 5 is the Menyoo PC which you can download here: Menyoo PC .
By default you can enable Menyoo PC, by pressing F8 in game
The install process is similar to what has been explained before. Just unzip it and Copy / Paste its files in your Main GTA 5 folder.
Another trainer that is specifically made for spawning add-on cars is the Add-On Vehicle Spawner that gives you a list of all the cars that you’ve added to your game. You can download this one too from this link and add it to your main game folder: Addon – On Vehicle Spawner.
By default, you can enable Addon Spawner by pressing F5 in your game. Then you can navigate to the Add-on section and find your vehicle.
6. Installing Gameconfig, Packfile Limit Adjuster and Heap Limit Adjuster
Alright, we are almost done with perquisites. To prevent errors and game crashes you need to add these to your game. Download and add these 2 in your main GTA 5 folder :
And download Gameconfig from here : Gameconfig for Limitless Vehicles
The installation path for this one is >>> mods/update/update.rpf/common/data which you have to use OpenIV in order to access it and replace it with the version you have.
That is all for perquisites. Now you can install GTA 5 mods in your game. In the following section, you’ll learn how to add a vehicle and spawn it in GTA 5.
Installing Vehicle mods for GTA 5
There are 2 methods for adding cars in GTA 5. First is the traditional “Replace” method which replaces the car you want in GTA 5 vanilla cars. Using this method is not recommended since it can slow down your performance while using heavier mods ( unless you choose lore-friendly mods ).
The recommended way is using Add-on method.
First, you have to pick a car you like to add. You can choose it from our library and pick a category you want: https://gtacarmods.com/cars/
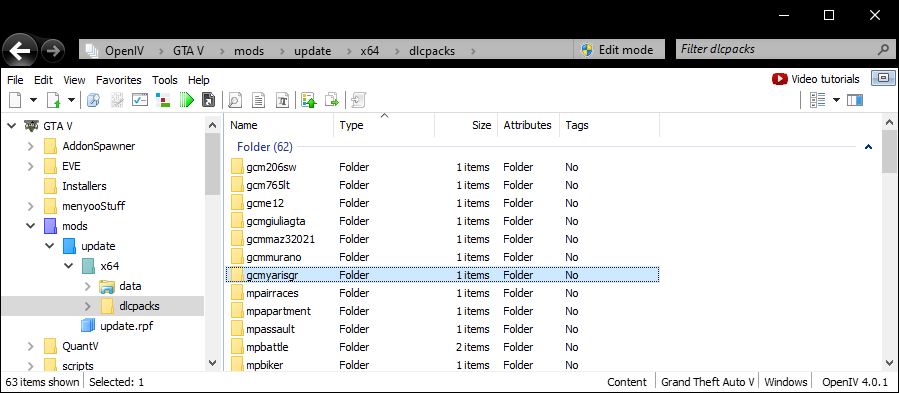
Let us say you’ve chosen Toyota GR Yaris. After you’ve downloaded it you’ll find a folder with the car name _ gcmyarisgr _ , containing dlc.rpf. With OpenIV navigate to this path :
mods > update > x64 > dlcpacks
move that folder here so have something like this :
now navigate to this path :
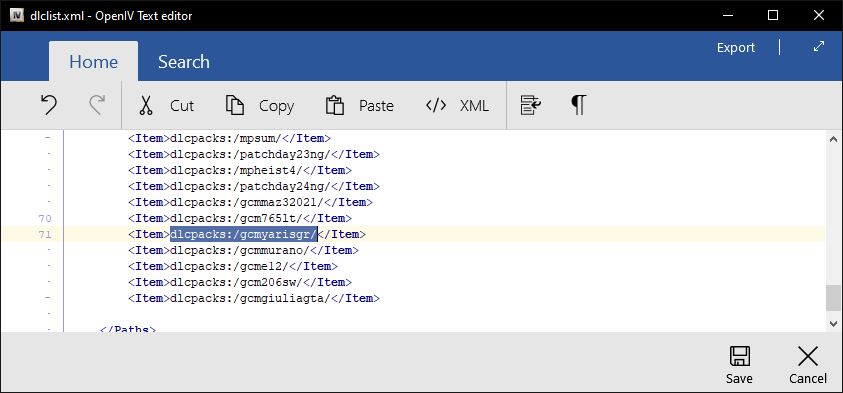
mods > update > update.rpf > common > data
with ” Edit mode ” active, select dlclist.xml , right-click on it, and select Edit. In dlclist.xml navigate to the bottom of the list and add a <Item></Item> with the name of your car. it should be formatted like this :
<Item>dlcpacks:/gcmyarisgr/</Item>
Save what you have changed and Its done ! now you can open GTA 5 and play with your favorite car. All you need to do is to press F5 once you are in the game and select your desired car with the help of Addon-spawner. You can use Menyoo PC too, but Add-on Spawner is easier to use for this purpose